The bathroom sink trap is the curved piece located under the drain that retains a permanent water seal to prevent bad odors and gases from the sewage system from rising into the bathroom, while also collecting small debris and facilitating unclogging. It exists in bottle, tubular, telescopic, and extensible versions.
The sink trap is one of those parts that no one looks at until it smells bad or leaks inside the vanity. However, it is what separates a healthy bathroom from one that smells like a sewer. In this guide, we explain what types of sink traps exist, how they differ, how to choose the right one, and how to solve the two most common problems—bad odors and leaks—judiciously and without calling the plumber at the first sign of trouble. The data and models cited are taken from the actual product sheets in the bathroom sink and bidet trap catalog at Merkimarket.
Key facts about the bathroom sink trap
- Function: to create a hydraulic closure (water seal) that blocks the passage of odors and gases from the sewage system.
- Main types: bottle, U/S tubular, telescopic, and extensible (horizontal and vertical).
- Materials: PVC/polypropylene for budget-friendly models; chrome-plated or lacquered brass for decorative and exposed ones.
- Exposed finishes: chrome, matte black, and other tones for countertop sinks where the trap remains visible.
- Common drain connection: 32 mm outlet for sinks (40 mm for bidets and kitchen sinks).
- Access: bottle models open at the base to clean without disassembling the entire unit.
- Warranty: the legal minimum of three years for consumers in Spain regarding lack of conformity.
With this, you now have the map; below we develop each point so you can choose and maintain your trap with confidence.
What the trap is and why it is essential
The trap is the curved section of pipe that connects the sink's drain valve to the main vertical stack. Its shape—a U, an S, or a bottle—is not a design whim: it is intended for a small amount of water to always remain trapped in the curve. This standing water is called the hydraulic seal, and it acts as an invisible plug that prevents gases from the sewage system, laden with bacteria and odor, from rising into your bathroom.
Without a trap, or with a trap that has lost its water, the sink becomes a direct path from the sewer to your face. That is why every sink, bidet, kitchen sink, or shower tray needs its own. In addition to the anti-odor seal, the trap serves a second, very practical function: it retains rings, plugs, and other small objects that fall down the drain, so they can often be recovered by opening the basin instead of losing them down the stack.

Types of bathroom sink traps
Not all traps are installed the same way nor fit in the same vanity. These are the four main formats you will find:
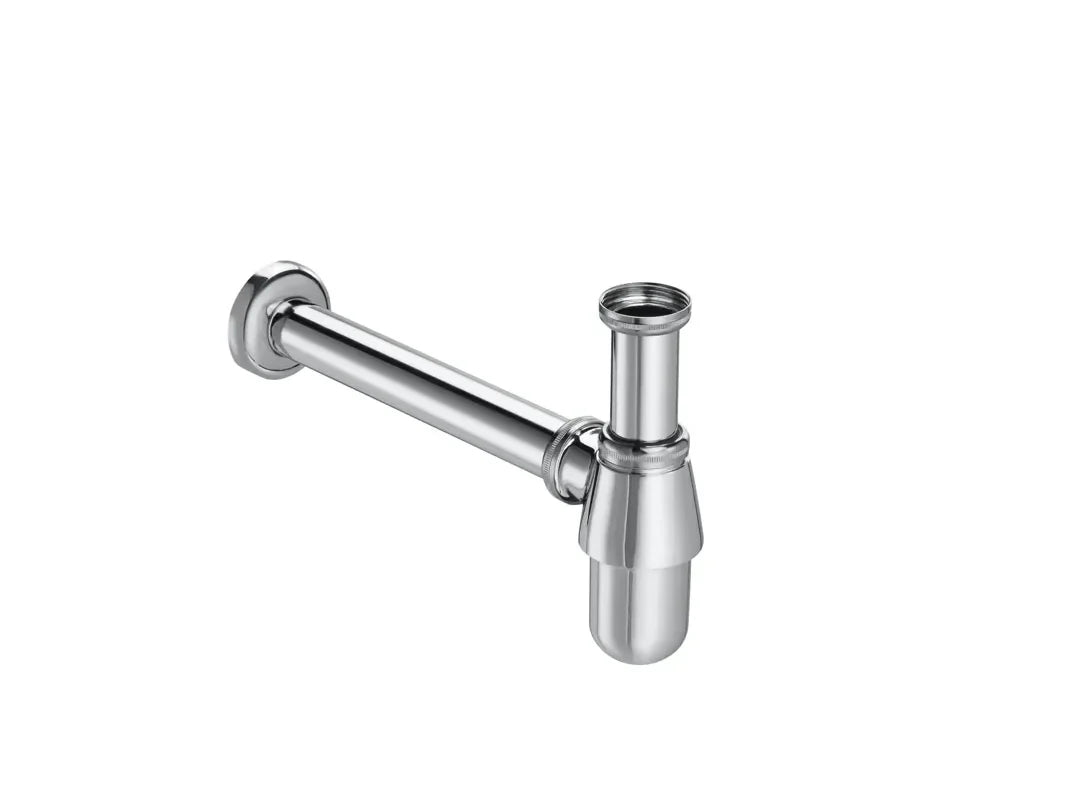
Bottle trap. The most common and easiest to maintain. It is shaped like a cup or bottle and opens from the bottom to clean accumulated debris without disassembling the entire installation. It is the best option when the trap remains visible, because there are decorative versions in chrome and other finishes, such as the Roca Aqua bottle trap, with a 25 cm tube.
Tubular trap (U or S). A bent tube that forms the retention curve. It is economical and compact, widely used inside vanities where it is hidden. Its weak point: to clean it, it usually needs to be disassembled.
Telescopic trap. Incorporates a tube that lengthens and shortens to adjust to the exact distance between the valve and the wall drain outlet. It forgives small installation mismatches and facilitates installation during renovations.
Extensible trap. Goes one step further and allows regulation both horizontally and vertically, ideal when the wall drain does not align with the sink. In modern countertop sinks, square models with a black finish are a hit, such as the square brass telescopic trap by Aquore.
| Type | Main advantage | Cleaning | When to choose it |
|---|---|---|---|
| Bottle | Bottom access for cleaning without disassembly | Very easy | Exposed trap or frequent maintenance |
| Tubular (U/S) | Economical and compact | Requires disassembly | Hidden inside the vanity |
| Telescopic | Adjusts to wall distance | Medium | Renovations with off-center drains |
| Extensible | Horizontal and vertical regulation | Medium | Countertop sinks and irregular installation |
Materials and finishes: brass, PVC, and decorative models
The material defines both durability and price. The most economical traps are made of PVC or polypropylene: they are lightweight, resistant to corrosion, and perfect when hidden inside a vanity. At the other extreme are chrome-plated or lacquered brass traps, which are more robust and designed to remain visible under a countertop or wall-mounted sink without a pedestal.
In this second group, the finish matters as much as the material. Chrome remains the safe neutral, but matte black has taken over in contemporary-style bathrooms, especially when combined with faucets of the same tone. An example is the minimalist black telescopic trap by Aquore, with an adjustable tube. The golden rule for a polished result is simple: choose the trap, the valve, and the faucet in the same finish, just as we recommend in our guide to bathroom faucets and finishes.

Bad odors in the sink: why they appear and how to eliminate them
If your sink smells bad, the problem is almost always in the trap's water seal. These are the most frequent causes and their solutions:
- The trap has dried out. In sinks that are not used for weeks (a second home, a guest bathroom), the water in the curve evaporates and the anti-odor plug disappears. Solution: run the faucet for a few seconds to refill the seal.
- Accumulation of debris. Soap residue, toothpaste, hair, and grease form a biofilm that smells. Solution: for bottle traps, unscrew the bottom basin and clean it; for tubular ones, disassemble and rinse.
- Poorly sized or non-existent trap. A drain connected directly to the stack, without a retention curve, always lets odor through. Solution: install a proper trap.
- Trap overloaded by self-siphoning. Poorly ventilated stacks can suck the water out of the seal. If the odor is recurrent despite cleaning, the installation's ventilation should be checked.
Avoid the temptation to cover the smell with harsh chemicals on a regular basis: they attack the seals and the tube itself. Periodic mechanical cleaning and hot water with a little vinegar resolve most cases.
Leaks in the trap: frequent causes and how to fix them
The other typical breakdown is a drip inside the vanity, which is often detected late, when the particle board has already swollen. Trap leaks are concentrated at the joints:
- Dried out or poorly placed seals. The rubber gaskets harden over the years. Replacing them is cheap and usually sufficient.
- Loose nuts. Trap tightening is done manually; a loose nut will drip. Tighten firmly by hand, without tools that could break the plastic.
- Damaged thread or cracked piece. Excess force or a bump can crack the brass or plastic. In that case, it is time to change the piece.
- Misaligned trap. Forcing the tube to reach the wall creates tension on the joints. Here, a telescopic or extensible model avoids the problem at the root.
In the event of any leak, dry the area, place paper under each joint, and turn on the faucet to locate exactly where the water is escaping before disassembling anything.
How to change a sink trap step by step
Replacing a trap is one of the most affordable plumbing repairs to do at home. A bucket and fifteen minutes are usually enough:
- Shut off the water supply as a precaution and place a bucket or tray under the trap to collect the retained water and debris.
- Disassemble the old trap by loosening by hand the nuts that connect it to the sink valve and the wall drain pipe. Dirty water will come out: this is normal.
- Clean the connections. Remove debris from the valve and the wall sleeve and check the condition of the seals.
- Position the new trap. If it is telescopic or extensible, adjust it to the exact distance without forcing it, leaving the rubber seals well seated at each joint.
- Tighten all nuts firmly by hand but without tools, so as not to break the plastic threads.
- Check for tightness. Turn on the faucet, fill the sink, and release the water all at once to test at maximum flow. Go over each joint with a dry hand; if moisture appears, tighten a little more or reposition the seal.

How to choose the right trap for your sink
To get it right, review four things in this order. First, if the trap will be visible: for a countertop or wall-mounted sink without a vanity, prioritize a decorative brass model that matches the faucet; if it will be hidden, a PVC bottle or tubular model is more than sufficient. Second, the distance to the wall drain: if the installation is not perfectly aligned, a telescopic or extensible model will save you headaches. Third, the outlet diameter, usually 32 mm for sinks. And fourth, the ease of cleaning: if you are into maintenance, the bottom access of bottle traps is a luxury.
If you are also renovating the entire setup, you may want to review our guides on countertop sinks: heights and measurements and bathroom vanities, because the trap and the vanity should be thought of together. You can see all the options available in the sink and bidet traps collection.
Frequently asked questions about the sink trap
Why does my sink smell bad even if it is clean?
It is most likely that the trap has lost the water in the hydraulic seal due to lack of use, or that it has accumulated debris. Run the faucet for a few seconds to refill the curve and, if the smell persists, clean the trap's basin.
What diameter trap does a sink need?
The standard outlet for a sink is 32 mm, while bidets and kitchen sinks usually use 40 mm. Always check the diameter of your valve and the wall sleeve before buying.
Is a bottle trap or a tubular one better?
The bottle trap is more comfortable to clean because it opens at the base without disassembling it, and it is ideal when it remains visible. The tubular one is more economical and compact, perfect hidden inside a vanity. Both block odors just as well.
Can I change the trap myself?
Yes. It is a simple repair: just loosen the nuts by hand, remove the old trap, place the new one adjusting the length, and tighten without tools. Then check for leaks by turning the faucet on full blast.
Article written by the Merkimarket editorial team. Data and models (types, materials, and finishes) taken from the actual product sheets in the Merkimarket trap catalog. Indicative measurements and availability may vary; consult each product sheet for the current information in Spain.